> ## Documentation Index
> Fetch the complete documentation index at: https://docs.formbox.app/llms.txt
> Use this file to discover all available pages before exploring further.
# Custom domains
> Serve your hosted forms from your own domain for a fully branded experience.
Custom domains are only available on the **Professional** and **Business** plans.
## Overview
Custom domains let you share your forms on your own web address instead of a Formbox link. That makes your forms feel more polished, easier to remember, and more on-brand.
A single domain can show **multiple forms** at different addresses. For example, one form can live at your domain root and another can live at a simple path like `/contact`.
Only published forms can use custom domains.
You can manage custom domains from the **Domains** page in your dashboard. Anyone with Admin or Member access can add a domain, verify it, and connect forms.
## Adding a custom domain
1. Navigate to **Domains** in your organization's dashboard sidebar.
2. Click **Add domain**.
3. Enter your domain name. This can be a subdomain like `forms.example.com` or your main domain like `example.com`.
4. Click **Add domain**.
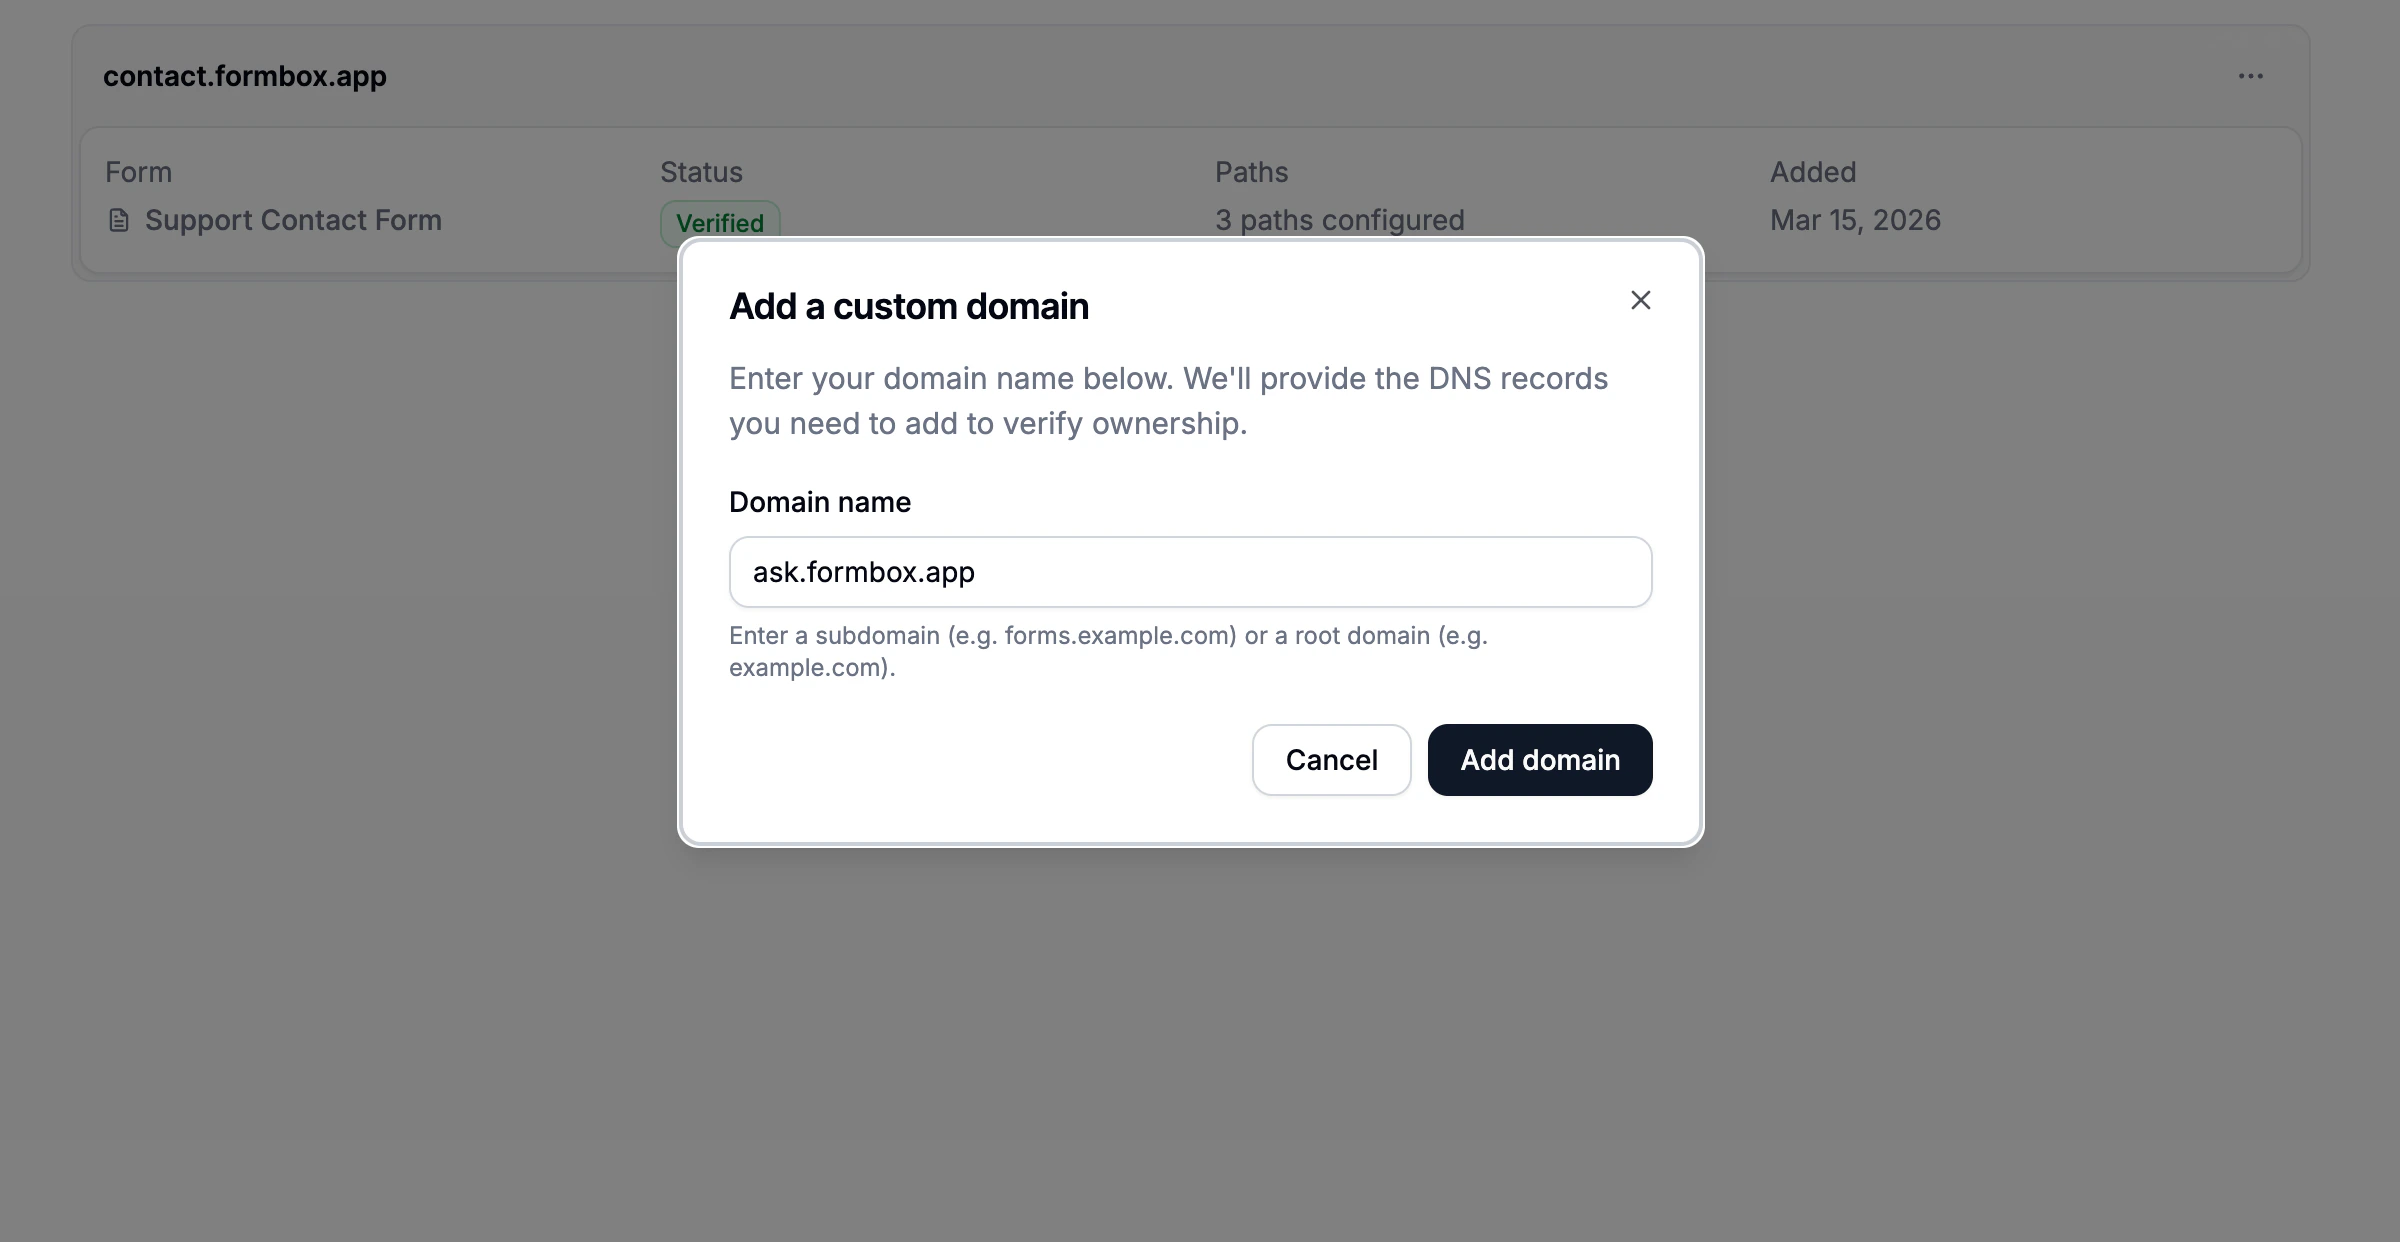 The domain will appear in your list with a **Misconfigured** status until you complete the DNS setup below.
## Verifying your domain
After adding your domain, click on it in the Domains list to open the domain detail page. From here you can see its current status and add your DNS records.
### Check your status
The **Overview** tab shows the current verification status of your domain.
The domain will appear in your list with a **Misconfigured** status until you complete the DNS setup below.
## Verifying your domain
After adding your domain, click on it in the Domains list to open the domain detail page. From here you can see its current status and add your DNS records.
### Check your status
The **Overview** tab shows the current verification status of your domain.
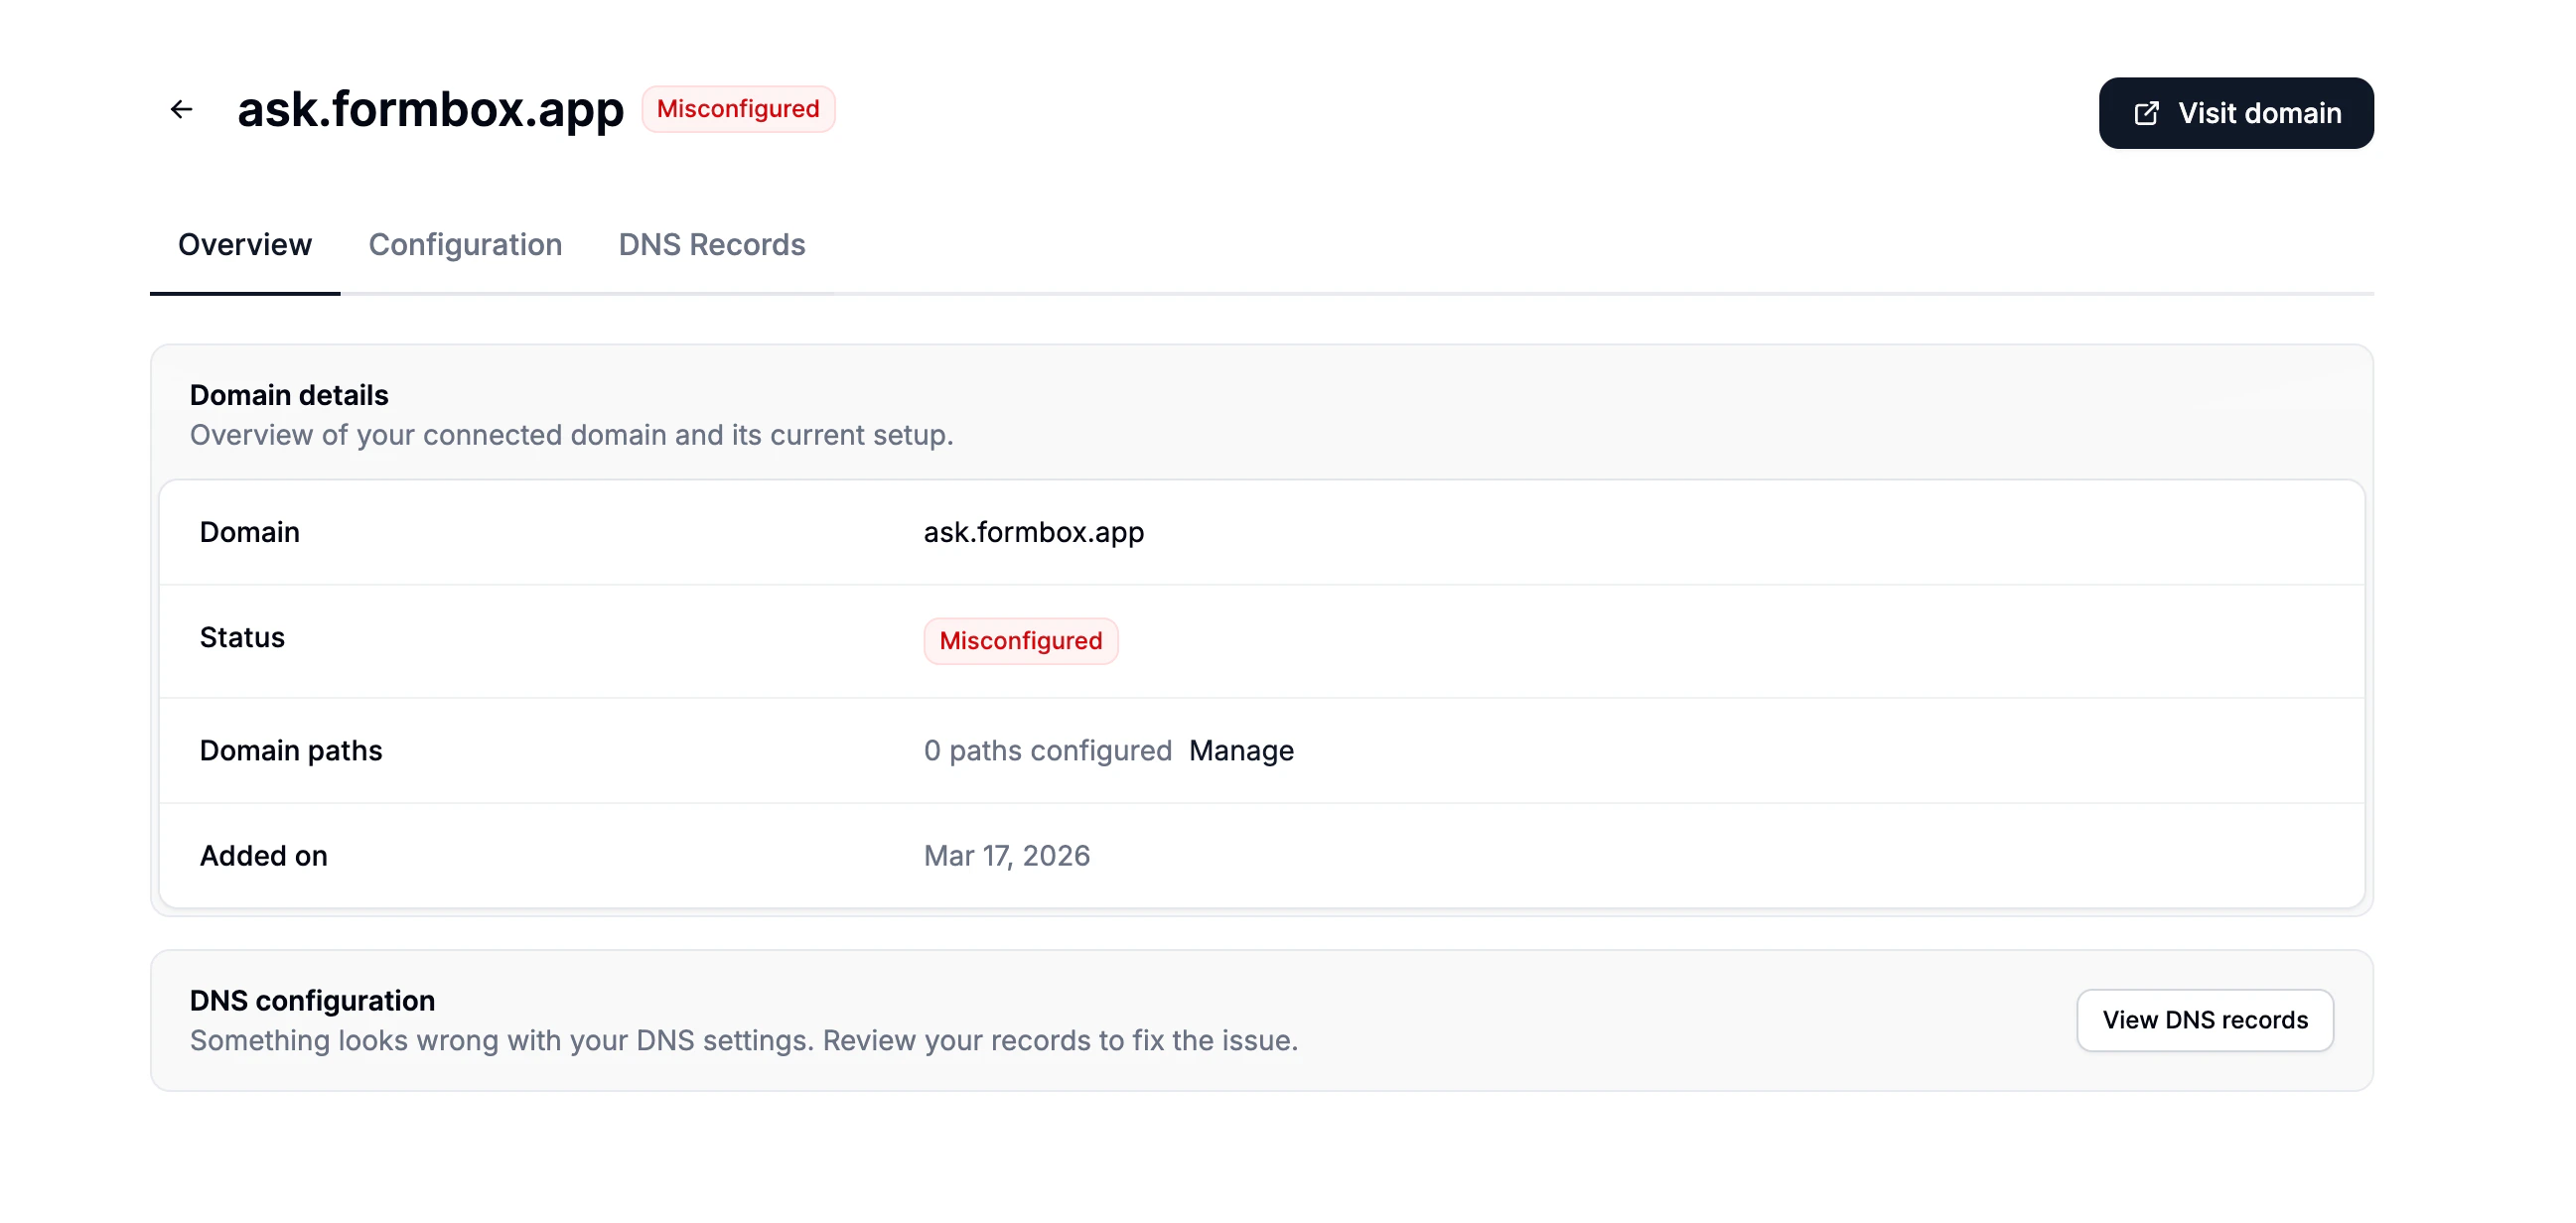 | Status | Meaning |
| ----------------- | ------------------------------------------------------------------------ |
| **Verifying** | DNS records were detected and verification is in progress. |
| **Verified** | Your domain is active and your form is live. |
| **Misconfigured** | The DNS records are missing or incorrect. Check them and try again. |
| **Error** | Something went wrong during verification. Check the error message shown. |
### Add DNS records
Open the **DNS Records** tab to see exactly which records to add. You'll need to log in to wherever you manage your domain (such as GoDaddy, Namecheap, Cloudflare, or similar) and add the records shown.
| Status | Meaning |
| ----------------- | ------------------------------------------------------------------------ |
| **Verifying** | DNS records were detected and verification is in progress. |
| **Verified** | Your domain is active and your form is live. |
| **Misconfigured** | The DNS records are missing or incorrect. Check them and try again. |
| **Error** | Something went wrong during verification. Check the error message shown. |
### Add DNS records
Open the **DNS Records** tab to see exactly which records to add. You'll need to log in to wherever you manage your domain (such as GoDaddy, Namecheap, Cloudflare, or similar) and add the records shown.
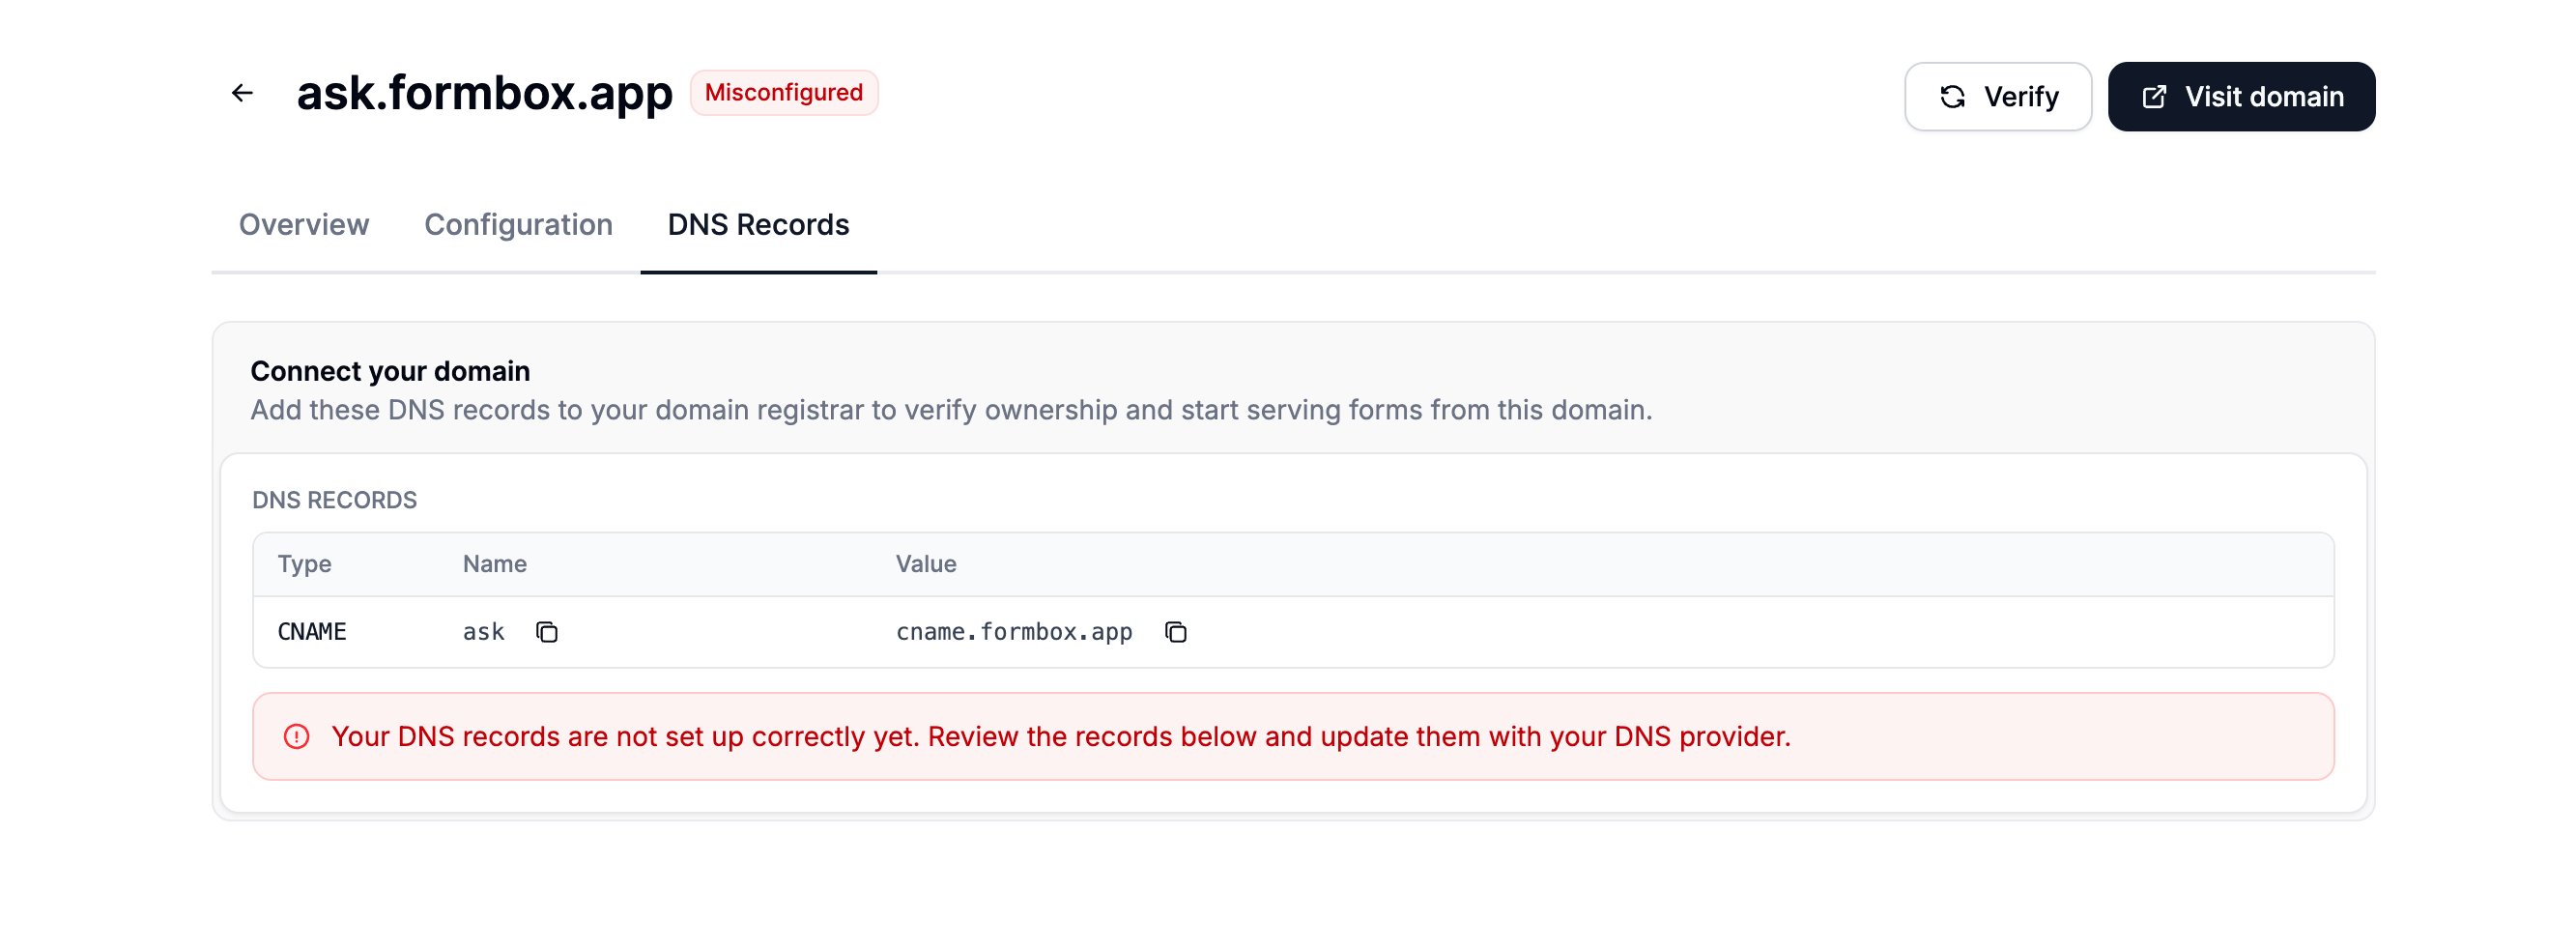 * **Subdomains** (e.g. `forms.example.com`): Add a **CNAME** record with the value shown in Formbox.
* **Root domains** (e.g. `example.com`): Add an **A** record with the IP address shown in Formbox.
Some domains also require a **TXT** record for verification. If one is needed, it will appear alongside the other records.
Once you've added the records, click **Refresh verification** in the top right corner to check whether everything is set up correctly. If the records are not showing yet, wait a few minutes and try again.
DNS changes can take anywhere from a few minutes to 48 hours to take effect, depending on your
domain provider. Most changes go through within a few minutes.
## Set up where your forms live
Once your domain is verified, you can connect forms to it from the domain's **Configuration** tab. Each connection maps a web address on your domain to a specific form.
1. Go to the **Domains** page and click on your verified domain.
* **Subdomains** (e.g. `forms.example.com`): Add a **CNAME** record with the value shown in Formbox.
* **Root domains** (e.g. `example.com`): Add an **A** record with the IP address shown in Formbox.
Some domains also require a **TXT** record for verification. If one is needed, it will appear alongside the other records.
Once you've added the records, click **Refresh verification** in the top right corner to check whether everything is set up correctly. If the records are not showing yet, wait a few minutes and try again.
DNS changes can take anywhere from a few minutes to 48 hours to take effect, depending on your
domain provider. Most changes go through within a few minutes.
## Set up where your forms live
Once your domain is verified, you can connect forms to it from the domain's **Configuration** tab. Each connection maps a web address on your domain to a specific form.
1. Go to the **Domains** page and click on your verified domain.
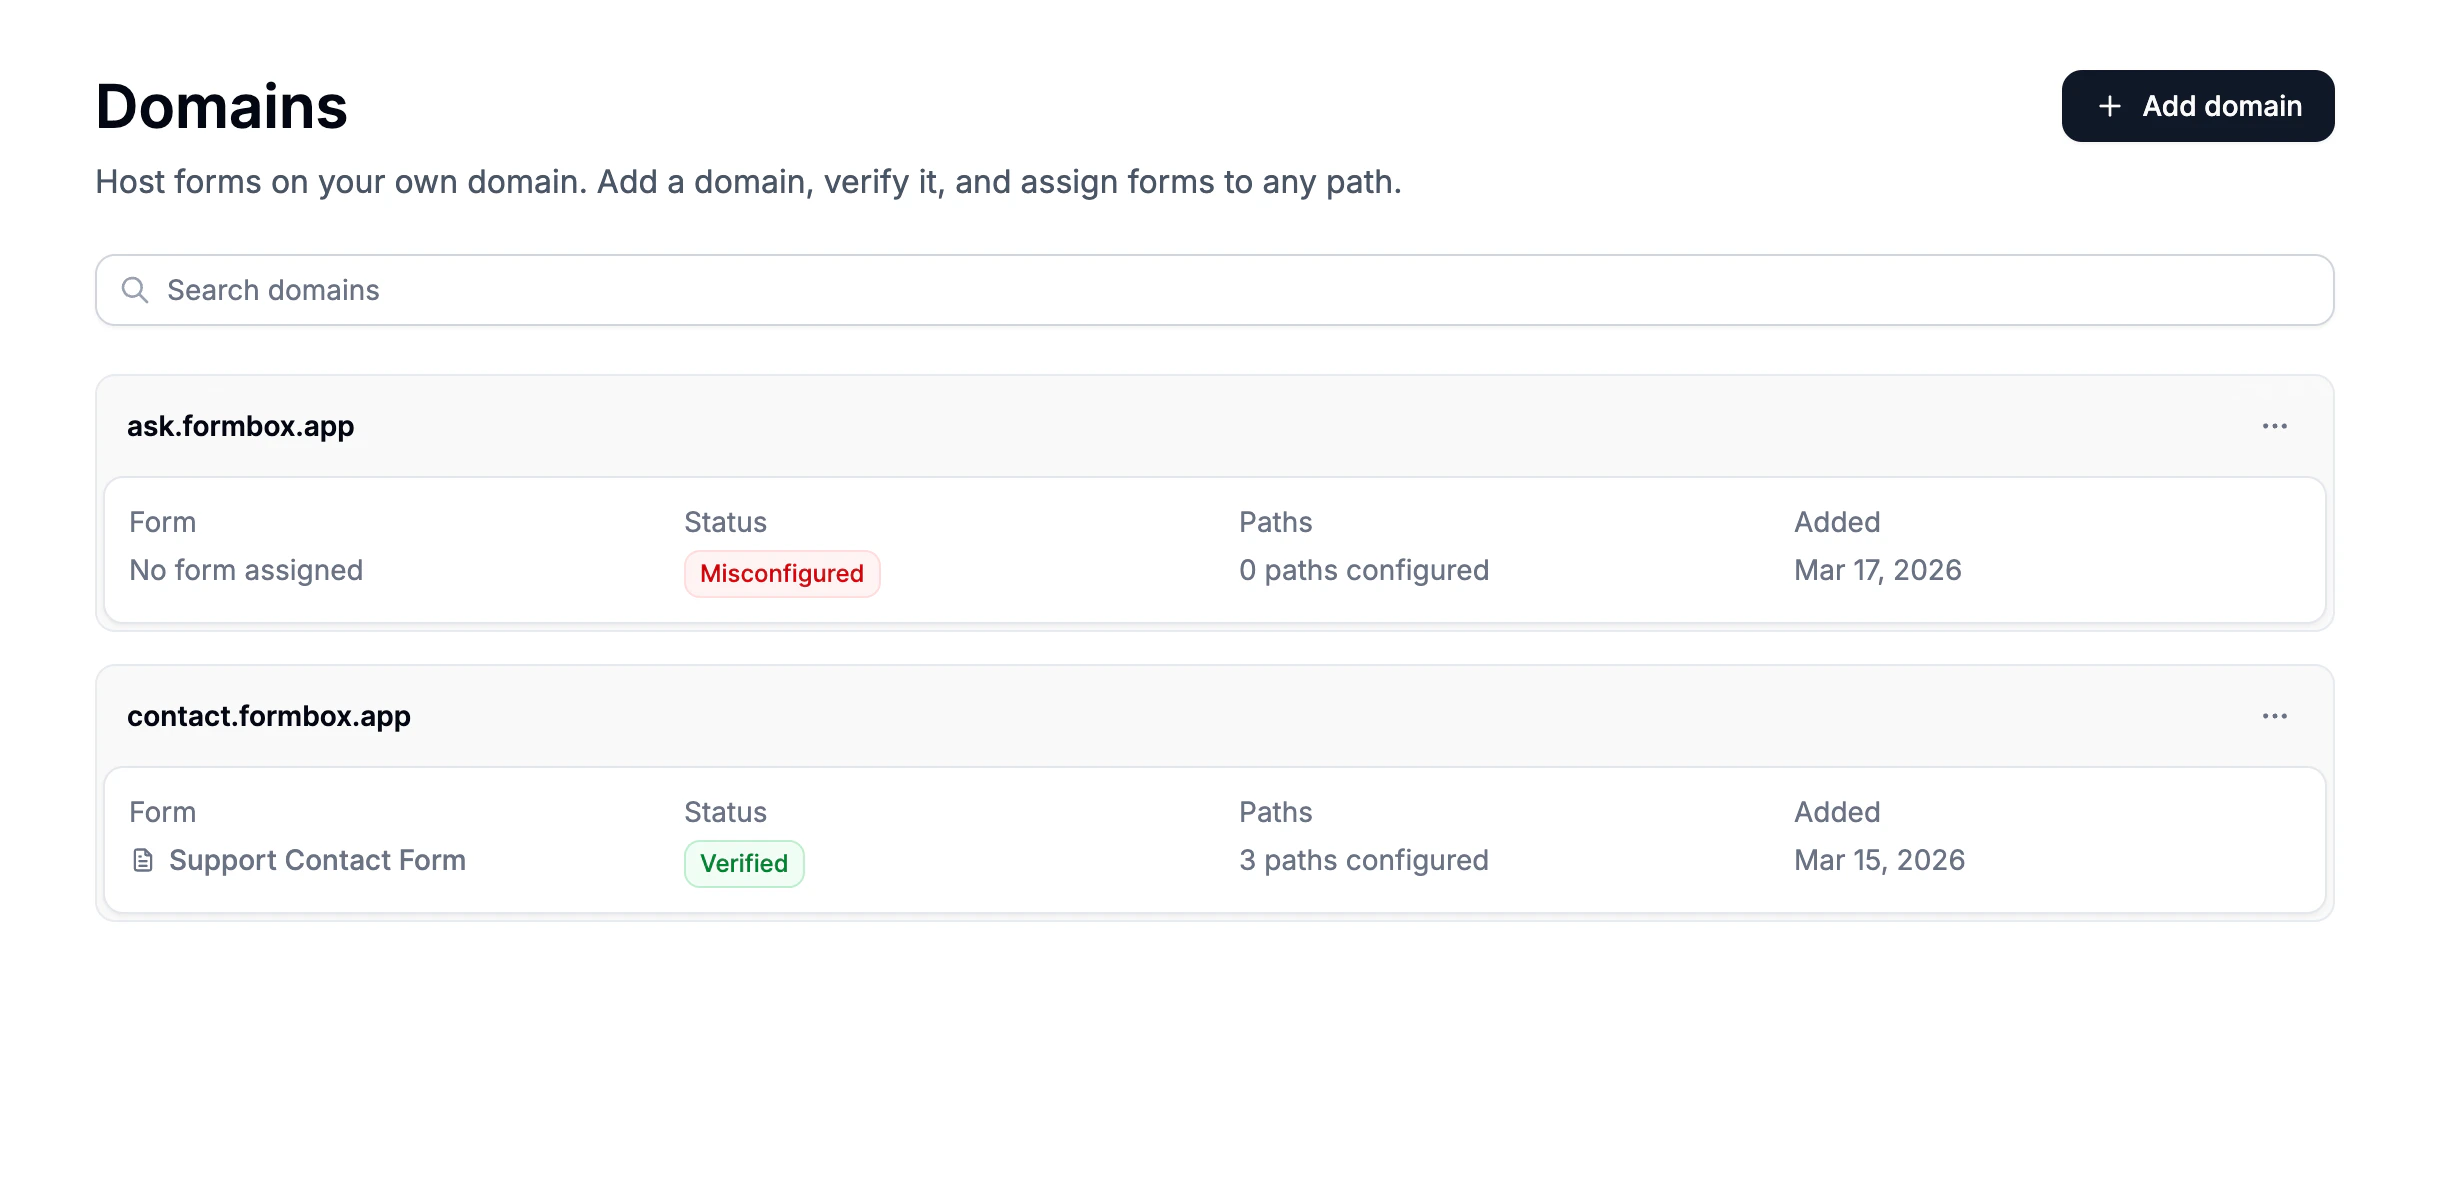 2. Open the **Configuration** tab.
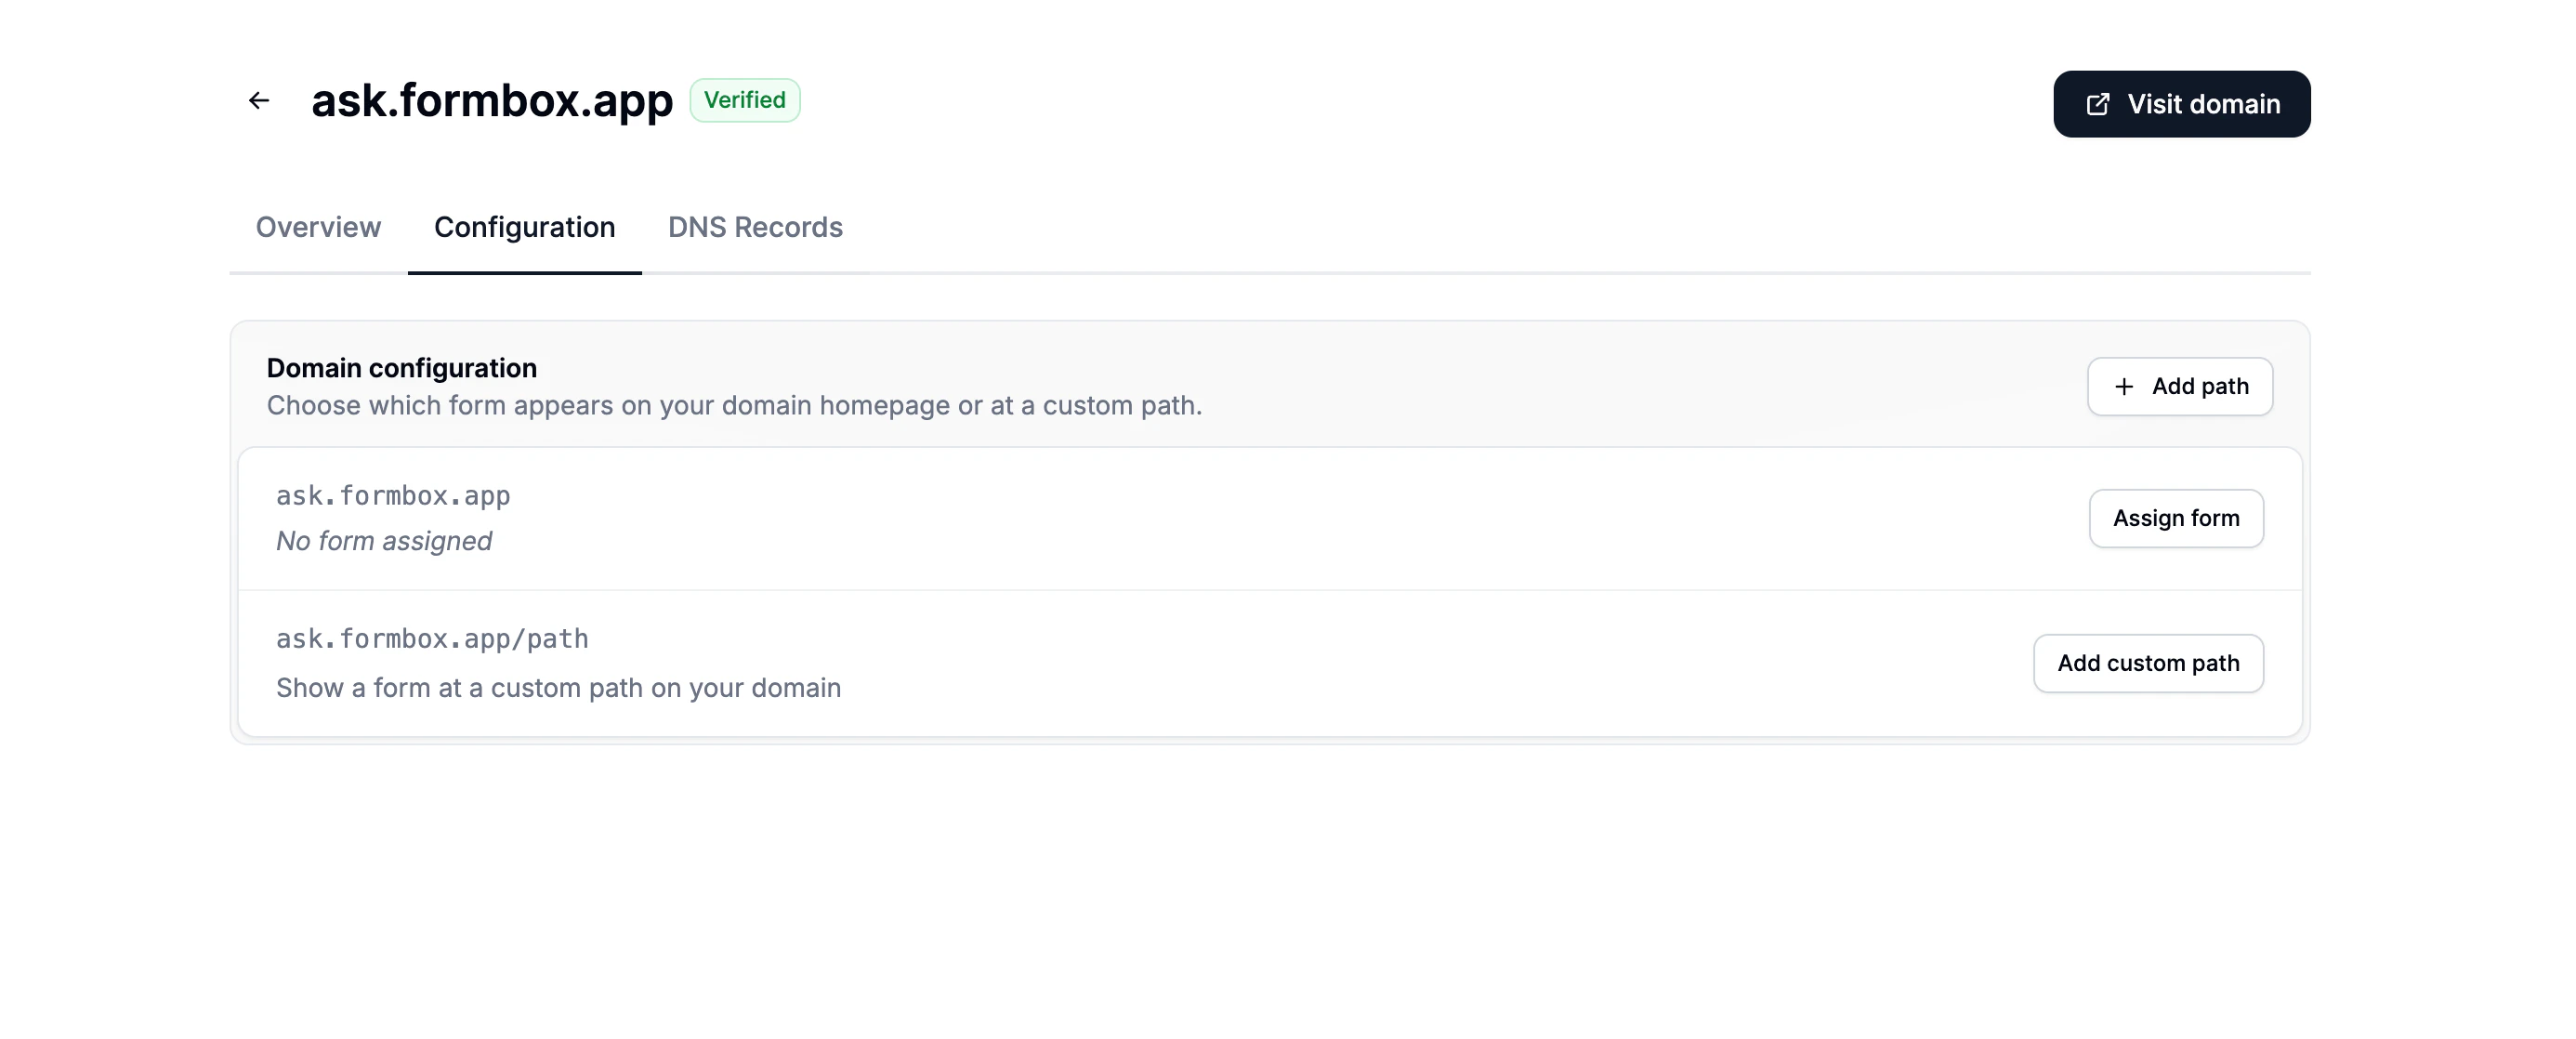 You'll see two starter rows: one for your domain's root and one for a custom path. You can set up either one first.
### Show a form at your domain root
Click **Assign form** next to your domain name. Pick a form from the dropdown and click the checkmark to save.
### Show a form at a custom path
Click **Add custom path** (or the **Add path** button in the top right) and enter a short path like `contact`. Pick a form from the dropdown and click the checkmark to save.
You'll see two starter rows: one for your domain's root and one for a custom path. You can set up either one first.
### Show a form at your domain root
Click **Assign form** next to your domain name. Pick a form from the dropdown and click the checkmark to save.
### Show a form at a custom path
Click **Add custom path** (or the **Add path** button in the top right) and enter a short path like `contact`. Pick a form from the dropdown and click the checkmark to save.
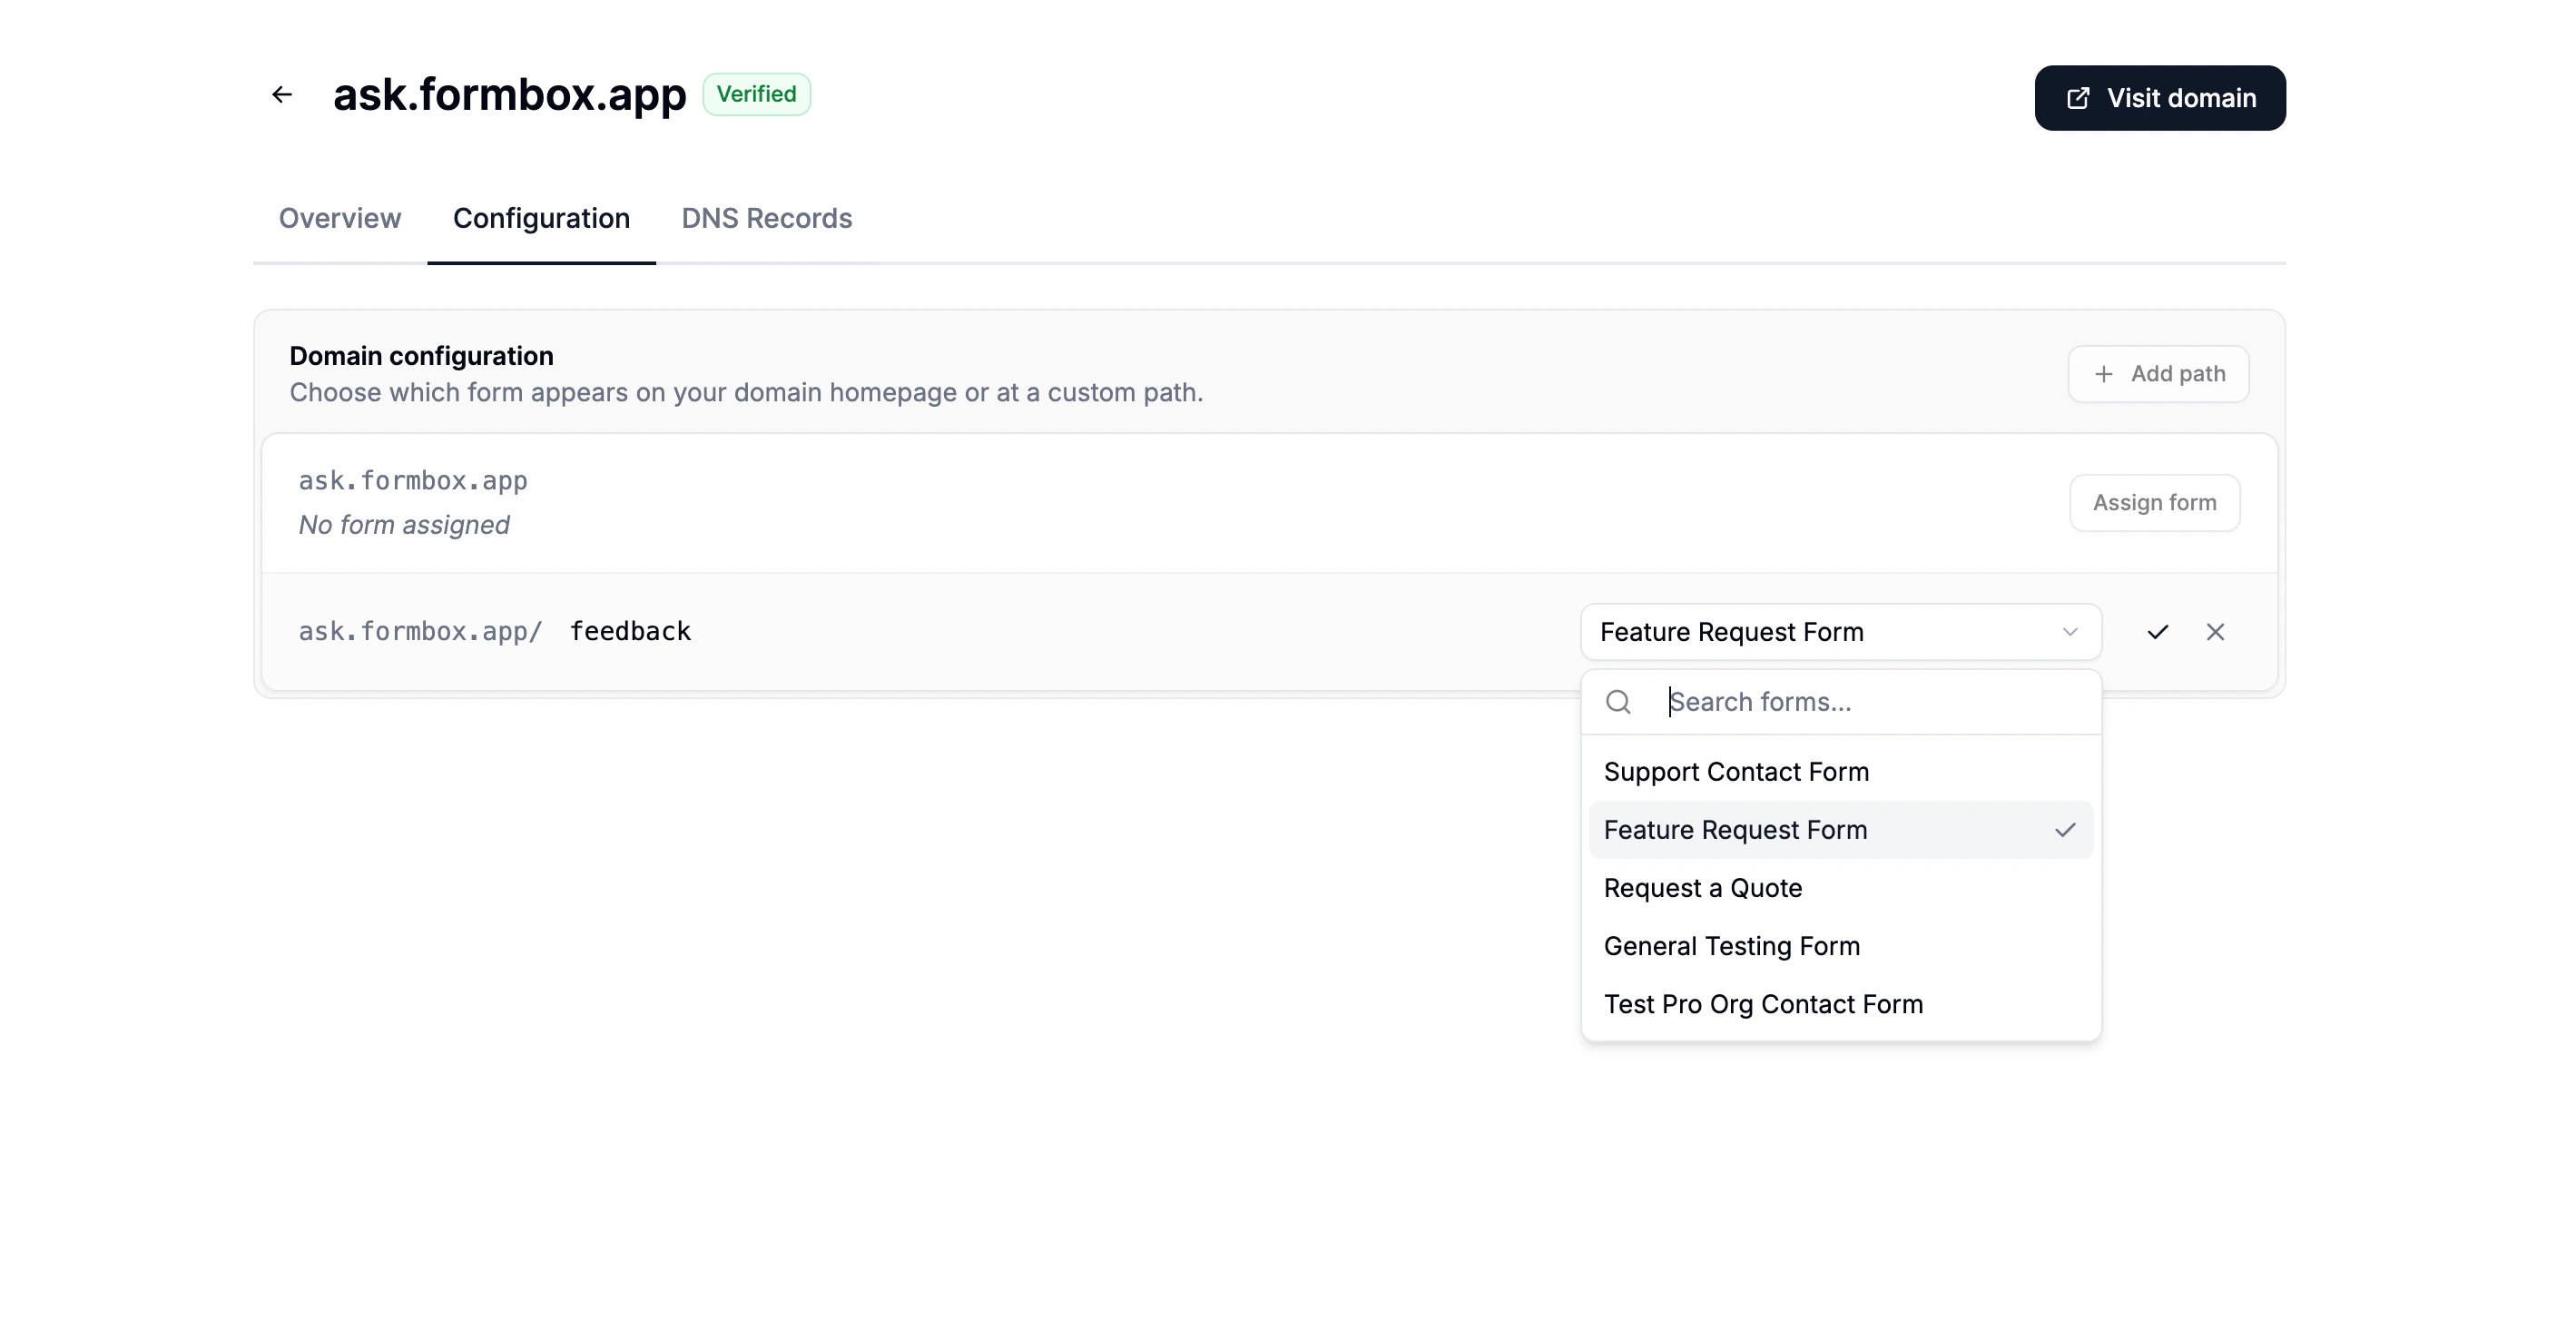 The form picker only shows forms that can be connected to a custom domain.
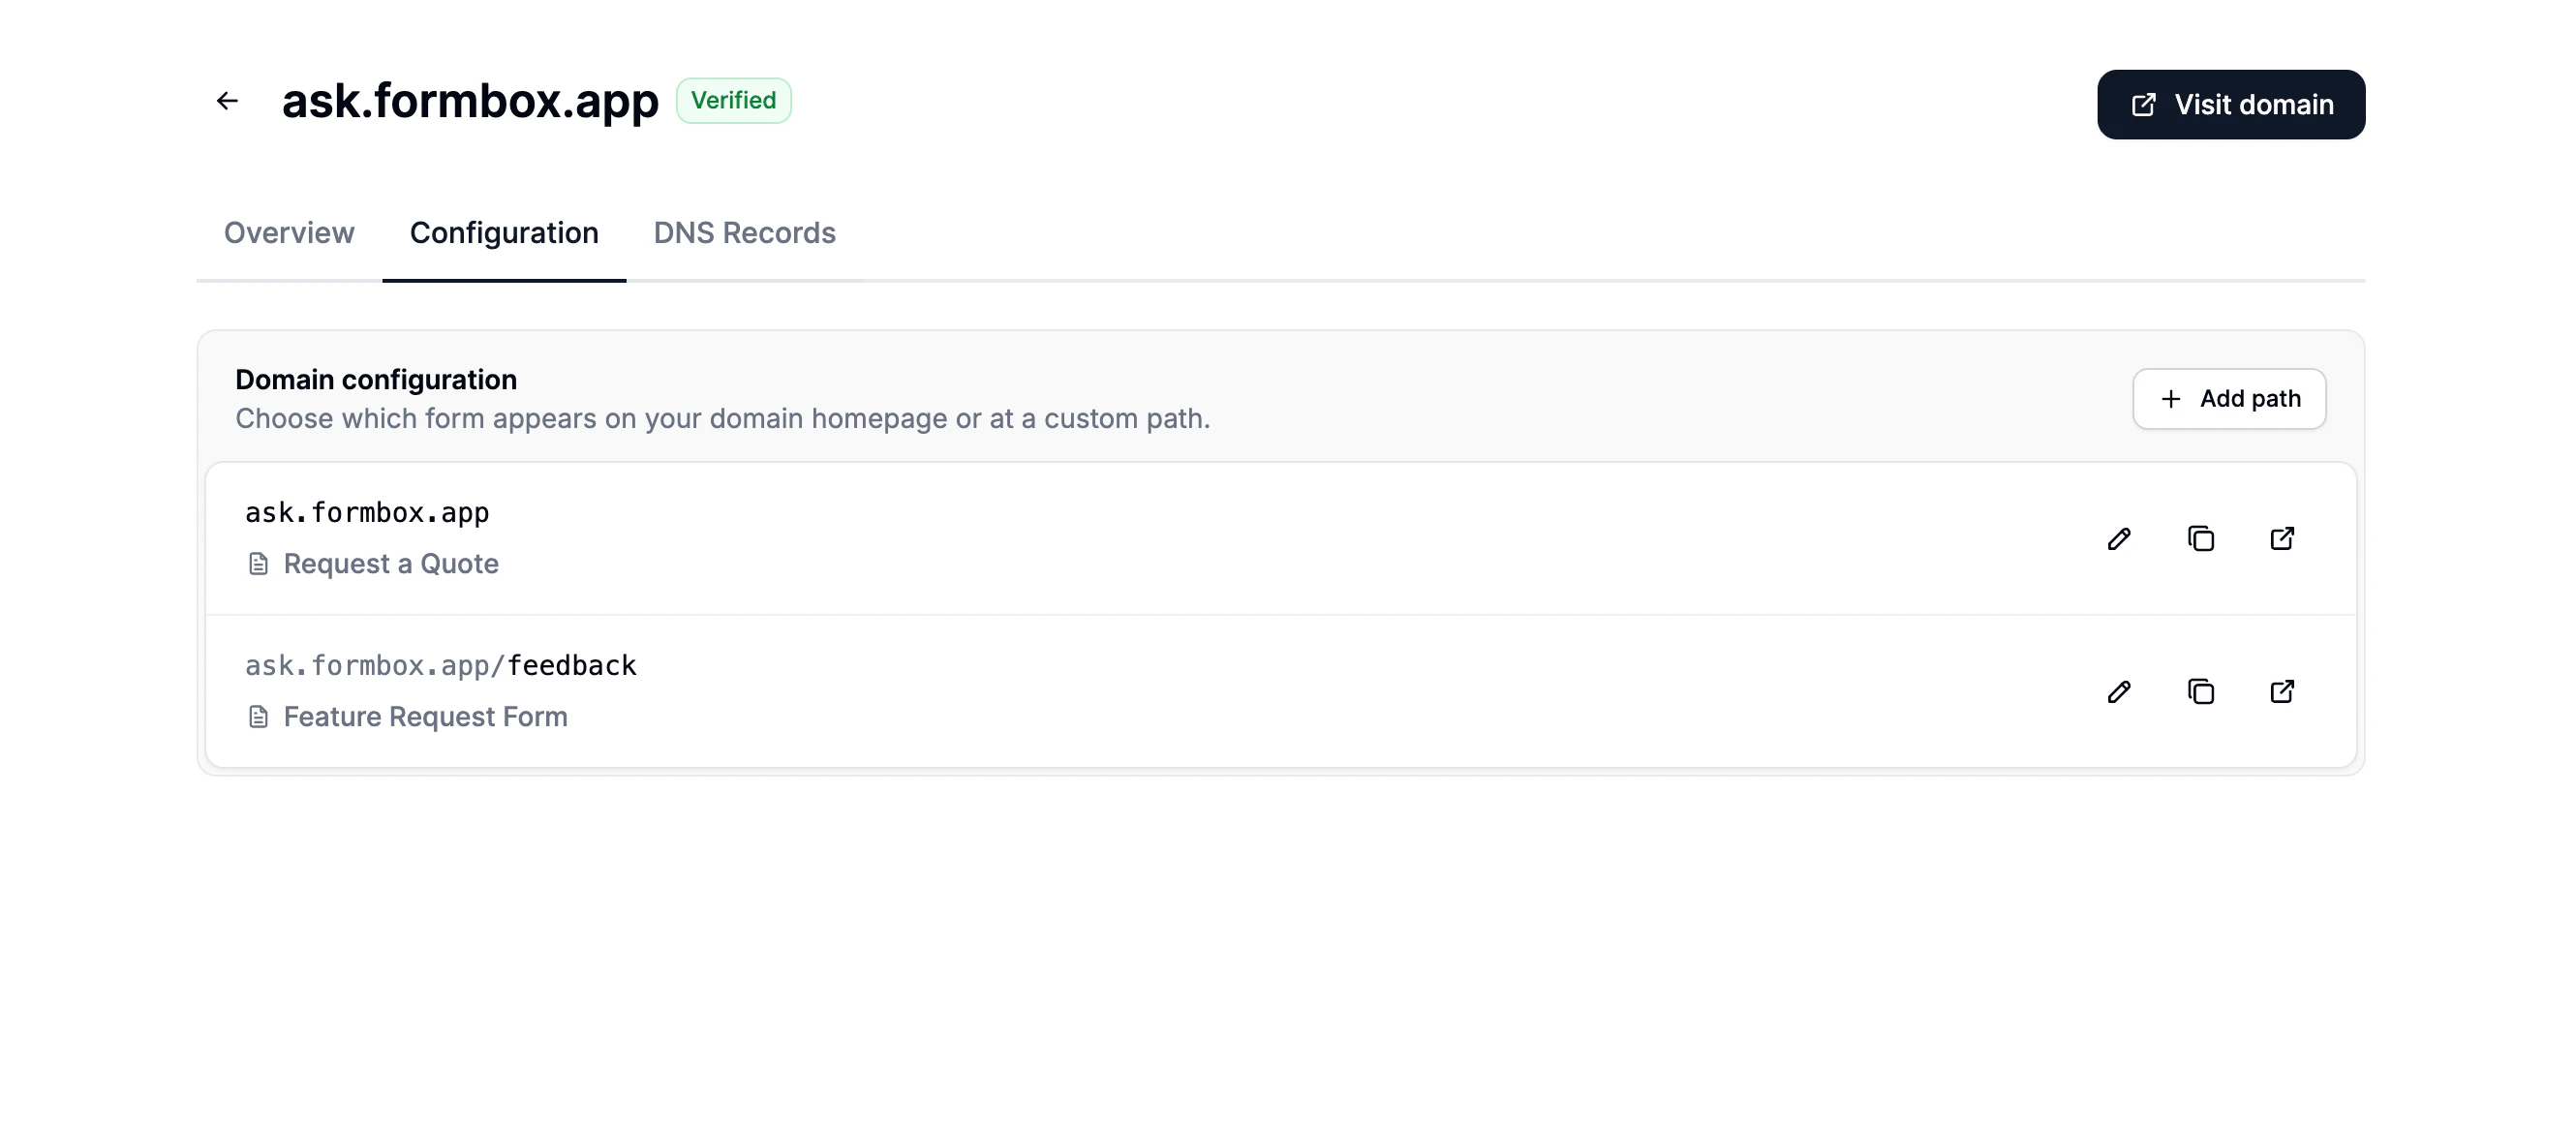 You can add as many paths as you need. Each form can only be connected to one address at a time.
Keep paths short and simple. Multi-level addresses like `/events/spring-registration` are not
supported yet.
### Connecting from within a form
You can also start the setup from inside a form:
1. Open the form and go to the **Settings** tab.
2. Scroll down to the **Custom domain** section.
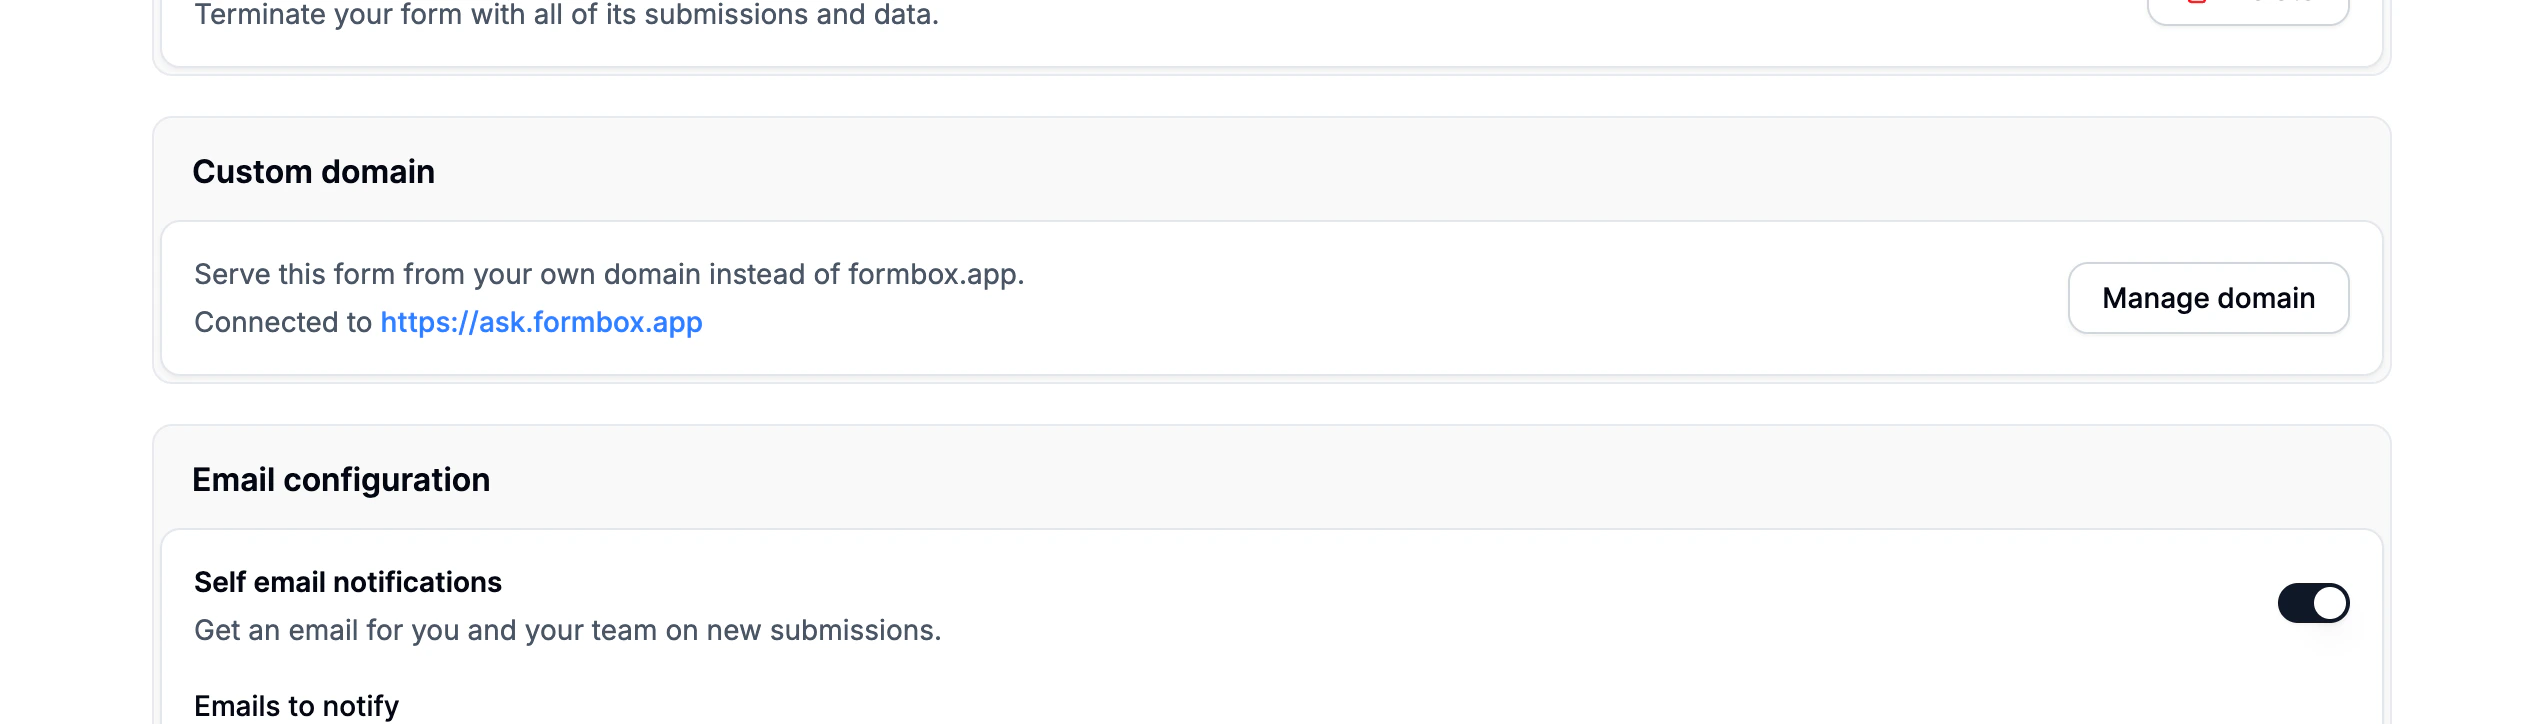
3. Click **Connect domain**. This takes you to the Domains page where you can set up a path for this form.
You can add as many paths as you need. Each form can only be connected to one address at a time.
Keep paths short and simple. Multi-level addresses like `/events/spring-registration` are not
supported yet.
### Connecting from within a form
You can also start the setup from inside a form:
1. Open the form and go to the **Settings** tab.
2. Scroll down to the **Custom domain** section.
3. Click **Connect domain**. This takes you to the Domains page where you can set up a path for this form.
 Once connected, the **Custom domain** section will show the domain name and a **Manage domain** link that takes you back to its settings.
 Custom domains only work with forms that are meant to be shared publicly.
## Sharing your form
Once a path is set up for your form, the **Share** tab will show your custom domain URL as the main link to share. Your original Formbox URL will still work as a backup.
Custom domains only work with forms that are meant to be shared publicly.
## Sharing your form
Once a path is set up for your form, the **Share** tab will show your custom domain URL as the main link to share. Your original Formbox URL will still work as a backup.
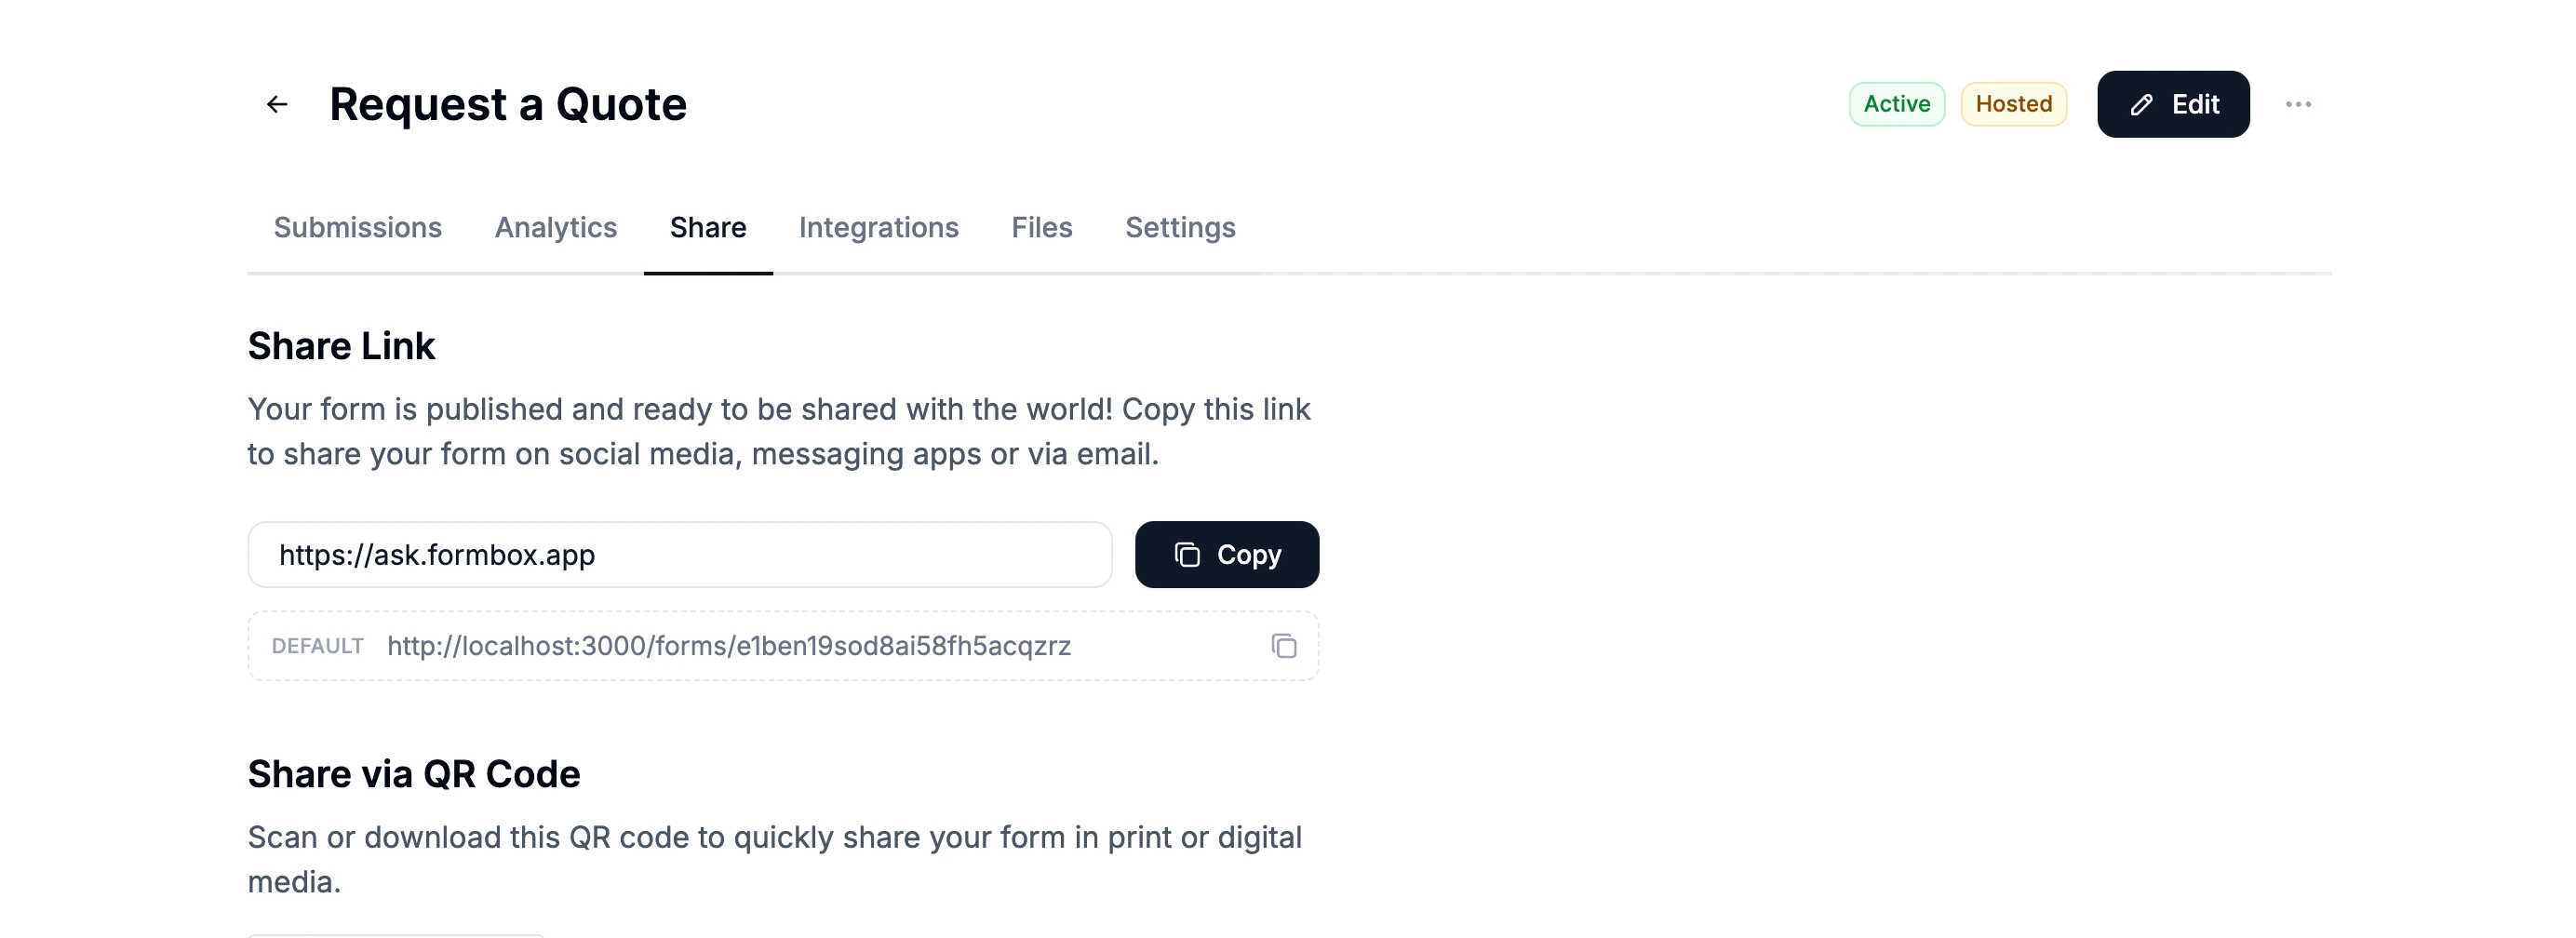 QR codes for your form will also use the custom domain URL.
## Changing a path
If you update the address for a form (for example, changing `/signup` to `/register`), the old address keeps working automatically. Anyone who saved or shared the old link will still reach the form. Old addresses are cleaned up when the form is fully disconnected from the domain.
## Removing a custom domain
1. Go to the **Domains** page in your organization dashboard.
2. Click the **more options** menu (three dots) on the domain you want to remove.
3. Select **Remove** and confirm.
QR codes for your form will also use the custom domain URL.
## Changing a path
If you update the address for a form (for example, changing `/signup` to `/register`), the old address keeps working automatically. Anyone who saved or shared the old link will still reach the form. Old addresses are cleaned up when the form is fully disconnected from the domain.
## Removing a custom domain
1. Go to the **Domains** page in your organization dashboard.
2. Click the **more options** menu (three dots) on the domain you want to remove.
3. Select **Remove** and confirm.
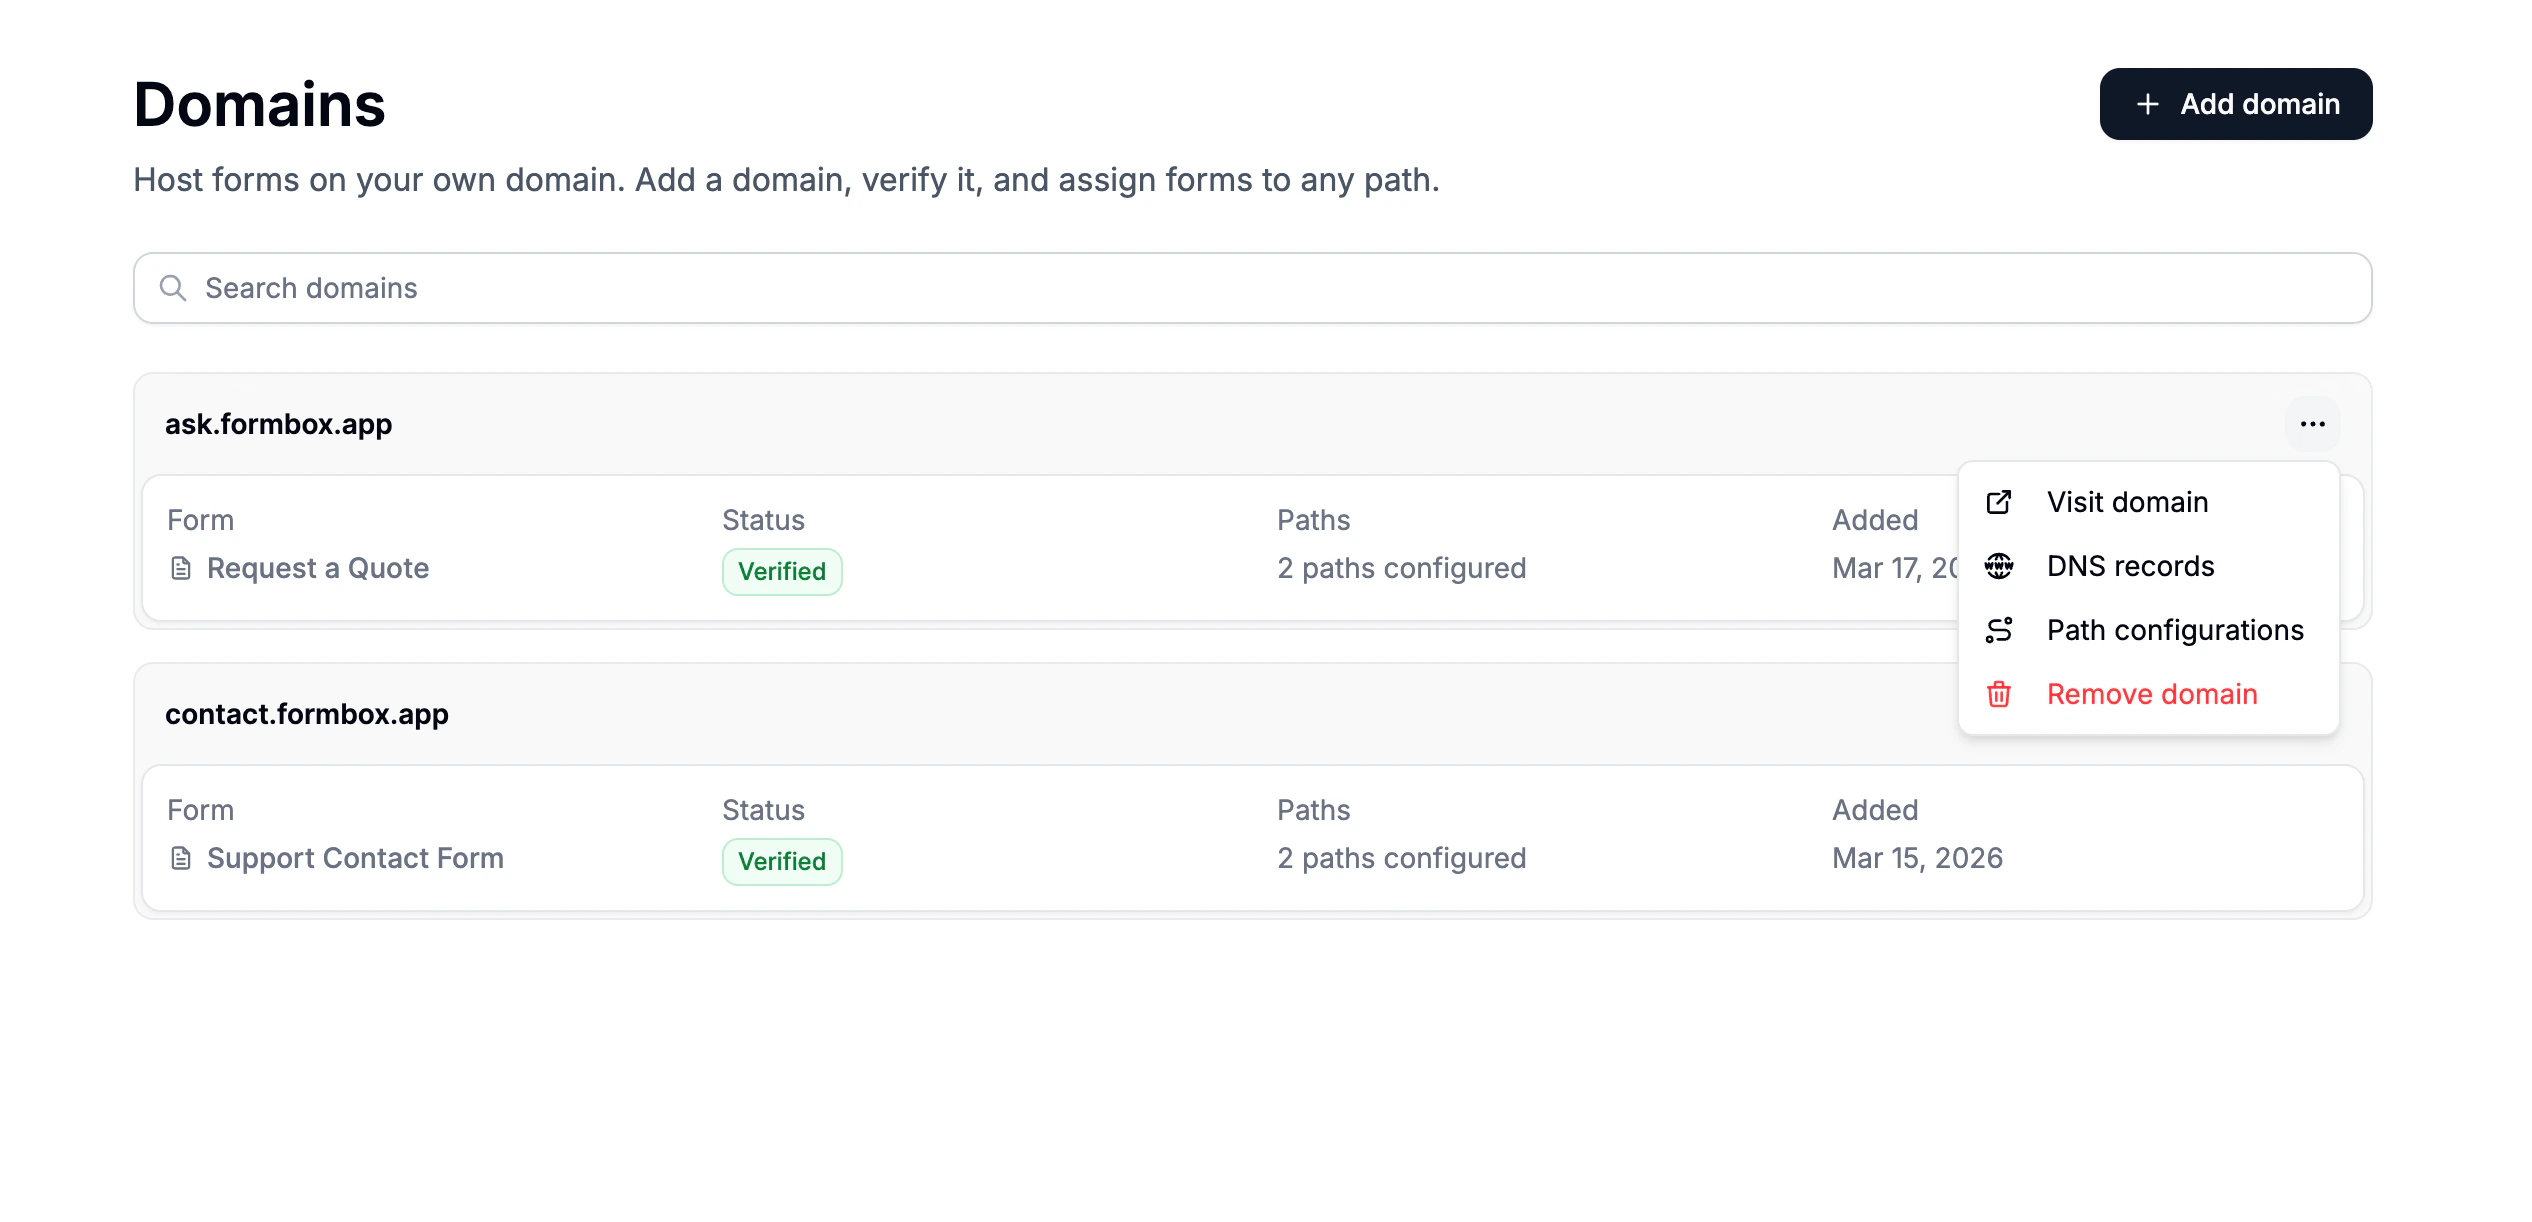 Removing a domain disconnects it from all forms. Each form will go back to using its default Formbox URL.
## Troubleshooting
### Domain is stuck on "Misconfigured"
* Double-check that the DNS records in your domain provider match exactly what Formbox shows.
* Make sure you're updating the right domain if you manage several.
* Wait a few minutes and click **Refresh**. DNS changes can take time to take effect.
* Check that you used the correct record type: subdomains need a CNAME record, root domains need an A record.
### Visiting my domain shows a "not found" page
* A path only works if you have explicitly set it up in the **Configuration** tab. Formbox does not create any paths automatically.
* If you want your domain root to show a form, click **Assign form** next to your domain name in the **Configuration** tab.
### The TXT verification record is not being detected
* Make sure the TXT record is added to the exact hostname shown in Formbox (it often starts with `_vercel`).
* Some domain providers want you to leave out your domain name from the record name field. Check your provider's help docs if you are unsure.
Removing a domain disconnects it from all forms. Each form will go back to using its default Formbox URL.
## Troubleshooting
### Domain is stuck on "Misconfigured"
* Double-check that the DNS records in your domain provider match exactly what Formbox shows.
* Make sure you're updating the right domain if you manage several.
* Wait a few minutes and click **Refresh**. DNS changes can take time to take effect.
* Check that you used the correct record type: subdomains need a CNAME record, root domains need an A record.
### Visiting my domain shows a "not found" page
* A path only works if you have explicitly set it up in the **Configuration** tab. Formbox does not create any paths automatically.
* If you want your domain root to show a form, click **Assign form** next to your domain name in the **Configuration** tab.
### The TXT verification record is not being detected
* Make sure the TXT record is added to the exact hostname shown in Formbox (it often starts with `_vercel`).
* Some domain providers want you to leave out your domain name from the record name field. Check your provider's help docs if you are unsure.